Checkout
Checkout is a flexible payment integration solution that enables you to embed a complete payment workflow in your product. It handles payment method integrations and processes sensitive payment information securely, reducing the scope of PCI compliance for you. It integrates with the Paybyrd Gateway to provide a seamless payment experience for your customers and simplifies integration with complex payment infrastructure.
How it works
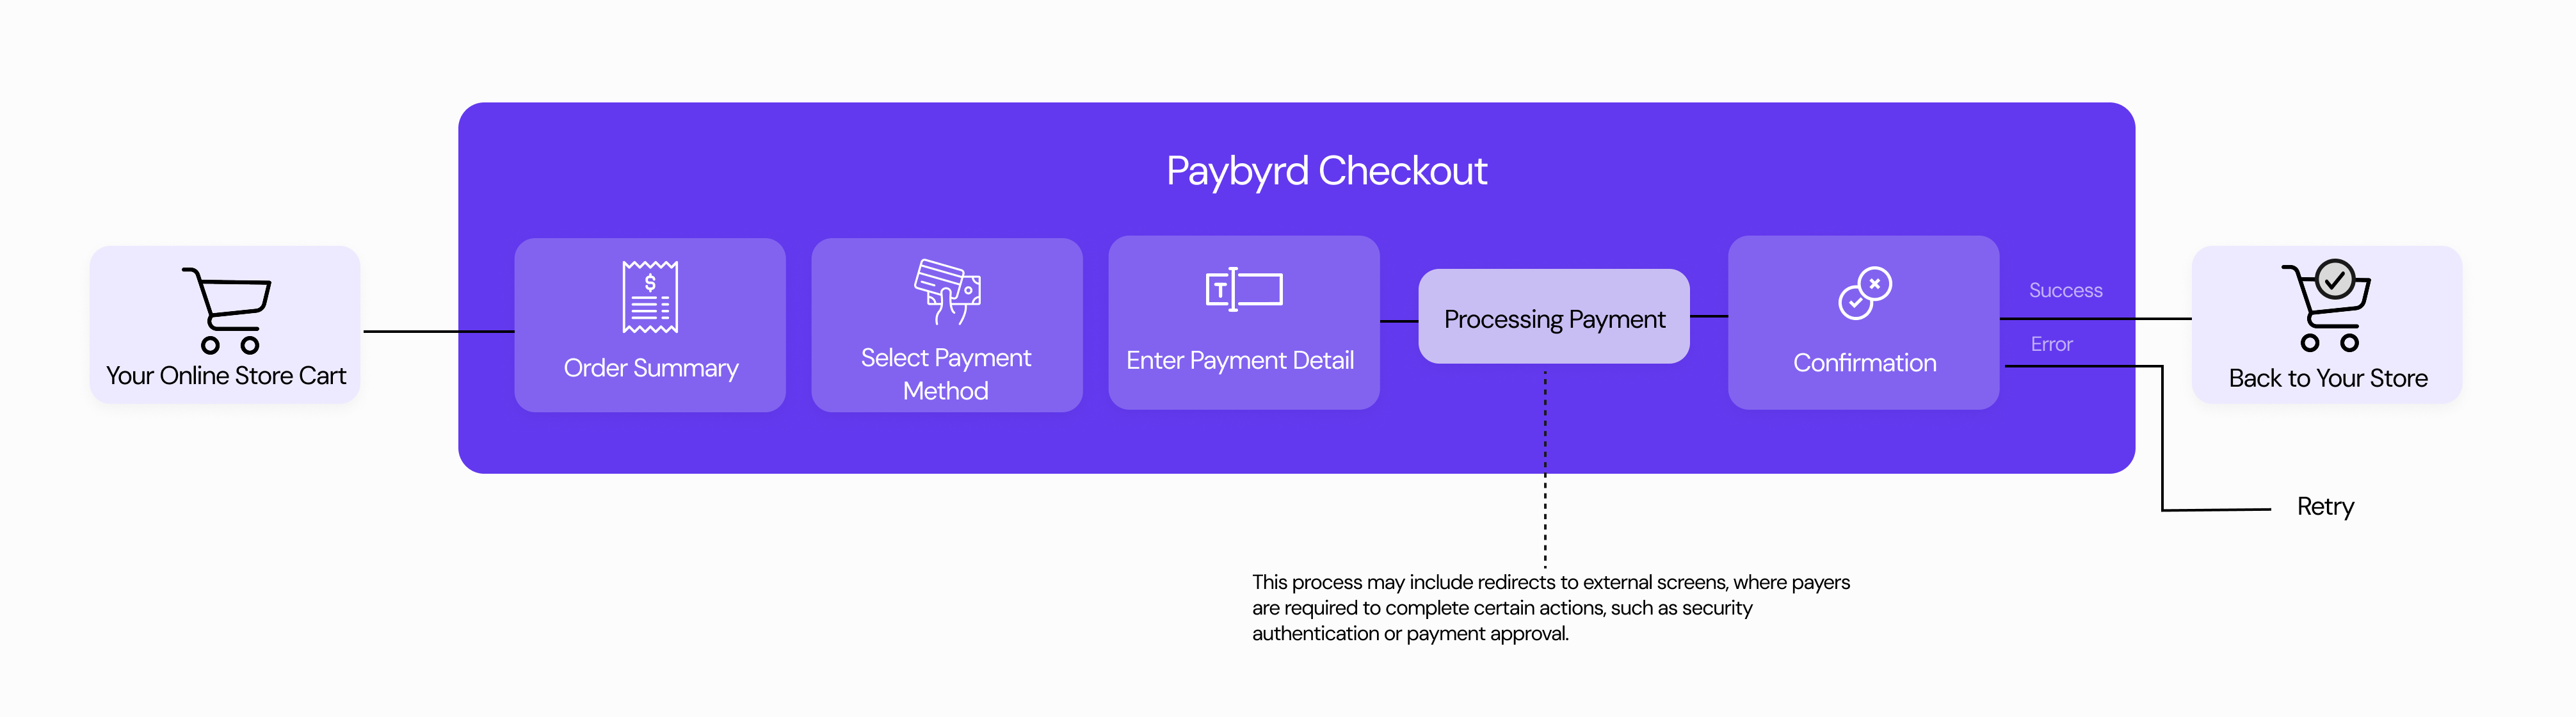
The Paybyrd Checkout flow
Paybyrd Checkout abstracts the complexity of payment processing by handling all payment method integrations and API communication on your behalf. Instead of building separate integrations for each payment method, you create an order through the Paybyrd API, which generates a secure checkout session. Your customers then complete their payment through the Paybyrd-hosted payment gateway, while you receive status updates and validation data through API responses and webhooks.
Ways to access Checkout
Customers can reach the Paybyrd Checkout payment gateway through several scenarios:
Ecommerce integration Customers shop on your online store and select Paybyrd as their payment option at checkout. Your backend (whether using plugins like WooCommerce, nopCommerce, Adobe Commerce (Magento), or custom implementations) automatically generates an order and redirects the customer to Checkout, either embedded in an iframe or in a separate tab. After completing payment, users are redirected back to your store.
Pay by Link You create an order (via API or the Paybyrd Dashboard) and send the generated checkout link directly to the customer via email, SMS, or other channels. The customer clicks the link and completes their payment through the Checkout interface.
Point of Sale (POS) A staff member initiates the payment through a POS device. The POS backend generates an order and displays Checkout within the device interface. The customer completes the payment directly on the POS device.
Display variants
Paybyrd Checkout supports 4 different display variants: default, immersive, detailed, and minimal:
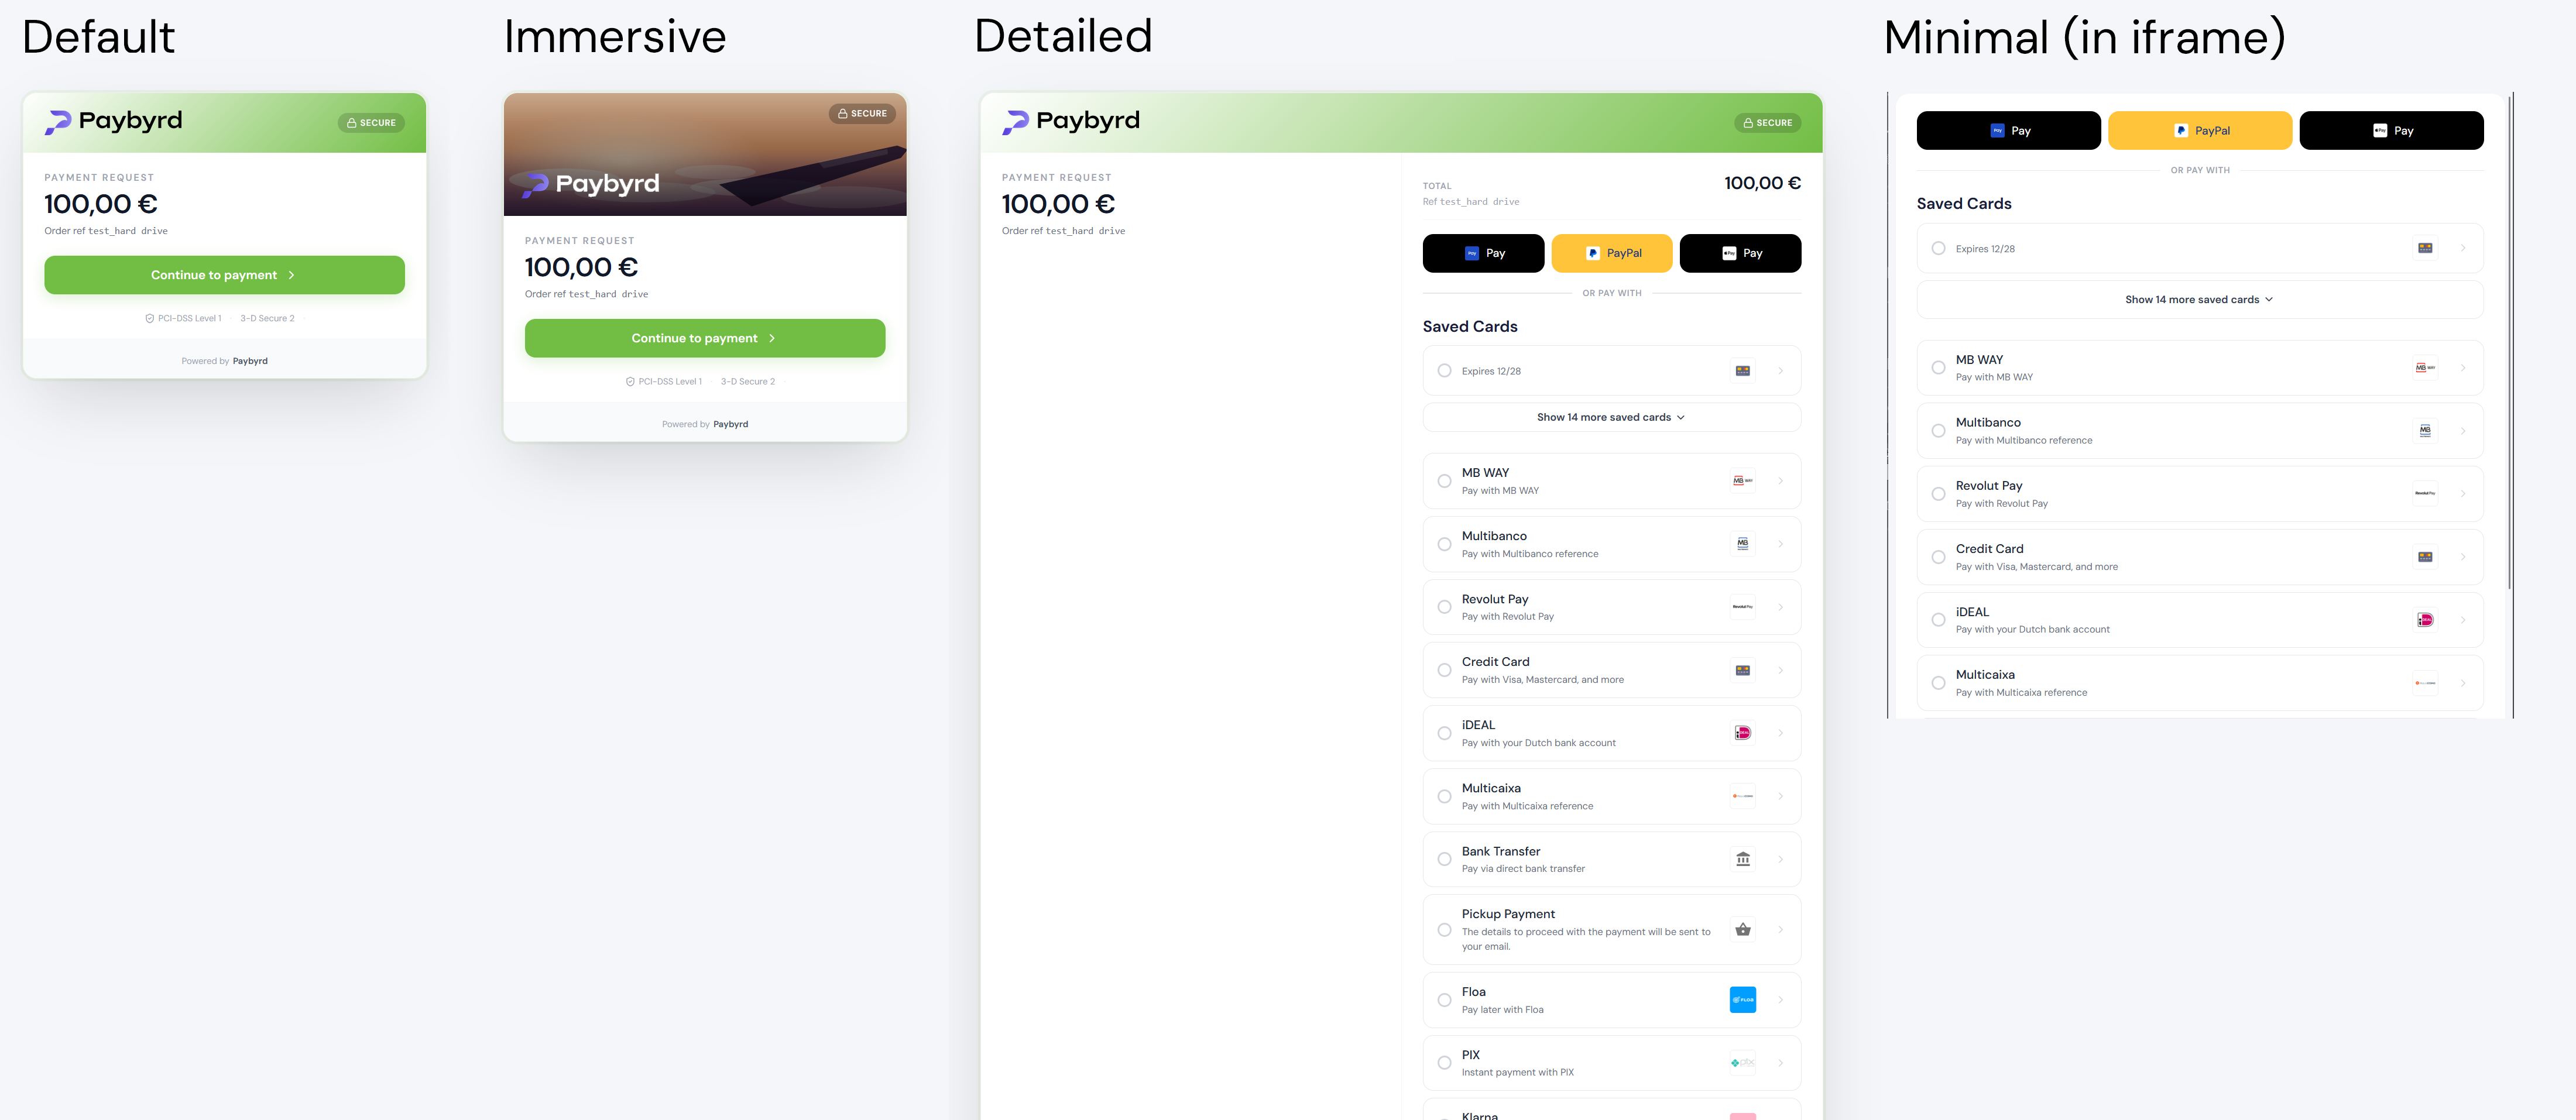
defaultshows all necessary details in a central view.immersiveis based ondefault, with an extra banner image at the top of the screen.detailedshows a clear overview of the payment details and the available payment methods all within one screen.minimalis recommended for using in iframes. It focuses on only displaying sections that the user can interact with.
You can set the display variant by adding a pathname parameter to the checkout URL. For example: https://chk.paybyrd.com/detailed?checkoutKey=...
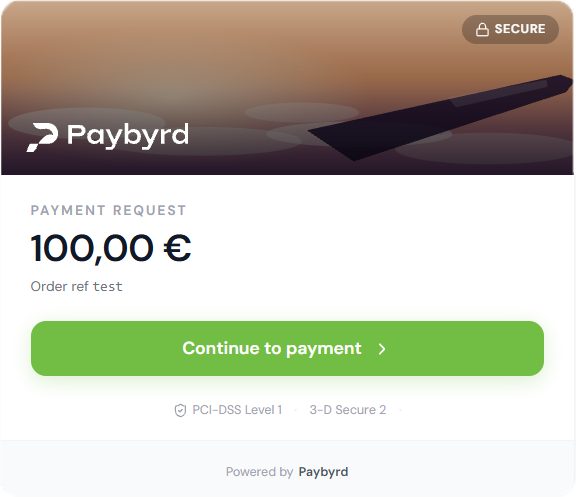
These are the banner images used for the immersive display variant:
Header image used for merchants in the air travel industry.
How to integrate
To integrate Paybyrd Checkout into your ecommerce website, your workflow should follow 3 simple steps:
- Generate an order
- Initialize a Checkout instance
- Validate the payment
This section will guide you through each step.
1. Generate an order
When a customer proceeds to the checkout page in your ecommerce website, you need to create an order using the Paybyrd API. Use the request body to add all order details, define the available payment methods, and set up redirects after payment conclusion.
The API’s response to your request contains all information needed to load the payment gateway and enable the end user to finish their payment.
For example:
curl --location -g --request POST '{{paybyrd-gateway}}/api/v2/orders
--header 'Accept: application/json'
--header 'Content-Type: application/json'
--header 'X-Api-Key: <your-API-key>'
--data '
{
   "amount":"15.00",
   "currency":"EUR",
   "orderRef":"ABC123456",
   "expiresIn":24,
   "shopper":{
      "firstName":"John",
      "lastName":"Doe",
      "email":"[email protected]",
      "phoneNumber":"+319999999921"
   },
   "orderOptions":{
      "redirectUrl":"<https://your-site-url/payment-finished>",
      "checkoutVersion":2
   },
   "paymentOptions":{
      "tokenOptions":{
         "customReference":"+319999999921"
      }
   }
}
'
{
"orderId":"13a8a157-81c9-46ea-84b4-2bef6daad3fa",
"orderDate":"2026-02-24T17:45:27Z",
"expiresAt":"2026-02-25T17:45:27Z",
"checkoutUrl":"https://chk.paybyrd.com/chk_a321as123a",
"checkoutKey":"eyJPcmRlcklkIjoiMzFhMDYzMmItODcxMy00NjIwLThiZjItMDdiN2UyZTk5MTRjIiwiT3JkZXJSZWYiOiI0MTAxMjA3MTU0IiwiUGVyc29uSWQiOjEwLCJMaXZlIjpmYWxzZSwiRW50aXR5SWQiOiIzMWEwNjMyYi04NzEzLTQ2MjAtOGJmMi0wN2I3ZTJlOTkeNGMiLCJBbW91bnQiOiI1MC4wMCIsIkN1cnJlbmN5IjoiRVVSIn0=",
"status":"created",
"isoAmount":15,
"currency":"EUR",
"orderRef":"ABC123456",
"shopper":{
"shopperId":"176b5023-1624-1d19-cdd2-c61b1be803b7",
"firstName":"John",
"lastName":"Doe",
"email":"[email protected]",
"phoneNumber":"+319999999921"
},
"orderOptions":{
"redirectUrl":"https://your-site-url/payment-finished",
"culture":"en-US",
"expiresIn":"24",
"checkoutVersion": 2
},
"paymentOptions":{
"tokenOptions":{
"customReference":"+319999999921"
}
},
"code":"BYRD200",
"description":"Operation successfully completed"
}Visit the API reference for more specific details.
Paybyrd Checkout supports Tokenized Payments, which enable future payments by storing card information. To enable Tokenized Payments, include the
tokenOptionsobject with acustomReferenceitem in the request body when creating an order.customReferenceshould be unique information from the end user.Check out the Tokenization guide to understand more.
After creating an order, the response from the Paybyrd API contains the necessary information you need for initializing a Checkout instance. These are:
orderId: a unique identifier for the order,checkoutKey: order details encoded in Base64 format,checkoutUrl: a URL that points to the payment gateway.
See the Checkout reference page for more information.
2. Initialize a Checkout instance
When the order is ready, you can initialize a Checkout instance in two ways:
- as an iframe embedded in your website,
- by taking users directly to the Checkout instance hosted by Paybyrd, via the checkout URL.
Both methods enable you to customize and fine-tune the payment experience using parameters that control:
- the language of the payment gateway,
- which display variant is shown,
- what payment methods are available for the user,
- whether you redirect the user to a different page after the payment is done,
- different UI elements like logo, header, footer, and colors.
Using an iframe
You can use an iframe to directly embed Paybyrd Checkout into your website. We highly recommend that you use this code snippet template to load the payment gateway when using an iframe:
(function() {
   function initCheckout(data) {
		const configs = btoa(JSON.stringify(data));
    const ENV_URL = '<https://chk.paybyrd.com/checkoutKey=${data.checkoutKey}&orderId=${data.orderId}&configs=${configs}>';
		const container = document.createElement('DIV');
		container.style.width = '100%';
		container.style.height = '100vh';

		const iframe = document.createElement('IFRAME');
		iframe.style.width = '100%';
		iframe.style.height = '100%';
		iframe.style.border = 'none';
		iframe.style.position = 'fixed';
		iframe.style.zIndex = 999999;
		iframe.style.top = 0;
		iframe.style.left = 0;
		iframe.id = 'pb-hf-ifrm';
		// Prod
		iframe.src = ENV_URL;
		iframe.onload = function() {
			document.body.style.overflow = 'hidden';
		}

		container.append(iframe);
		document.body.append(container);
	}

  const paybyrd_params = THIS_DATA_SHOULD_BE_DEFINED_BY_THE_SERVER;

	initCheckout({
		redirectUrl: paybyrd_params.redirectUrl,
		locale: paybyrd_params.locale
		theme: {
			backgroundColor: paybyrd_params.theme.hfBackgroundColor,
			formBackgroundColor: paybyrd_params.theme.hfFormBackgroundColor,
			primaryColor: paybyrd_params.theme.hfPrimaryColor,
			textColor: paybyrd_params.theme.hfTextColor,
      effectsBackgroundColor: paybyrd_params.hfEffectsBackgroundColor,
		},
    autoRedirect: true,
    showCancelButton: false,
    skipATMSuccessPage: false,
    compact: false
	});
})();
Note the configuration parameters under initCheckout.
Using a direct URL
You can also use a direct URL to take your customers to the Paybyrd payment gateway within the same page or in a new tab. This URL requires the ?checkoutKey and ?orderId query parameters:
https://chk.paybyrd.com/#/payment?checkoutKey={CHECKOUT_ID}&orderId={ORDER_ID}&configs={CONFIGS}You can also use the ?configs query parameter to enable further customization. The value of this parameter is the configs JSON object encoded to base64 format.
{
   "redirectUrl":"https://your-site-url/payment-finished",
   "locale":"en_US",
   "theme":{
      "backgroundColor":"#F0F0F0",
      "formBackgroundColor":"#3C3C3C",
      "primaryColor":"#CCCCCC",
      "textColor":"#FFFFFF",
      "effectsBackgroundColor":"#DBDBDB"
   },
   "autoRedirect":true,
   "showCancelButton":false
}ewogICAicmVkaXJlY3RVcmwiOiJodHRwczovL3lvdXItc2l0ZS11cmwvcGF5bWVudC1maW5pc2hlZCIsCiAgICJsb2NhbGUiOiJlbl9VUyIsCiAgICJvcmRlcklkIjoiMTNhOGExNTctODFjOS00NmVhLTg0YjQtMmJlZjZkYWFkM2ZhIiwKICAgImNoZWNrb3V0S2V5IjoiZXlKUGNtUmxja2xrSWpvaU16RmhNRFl6TW1JdE9EY3hNeTAwTmpJd0xUaGlaakl0TURkaU4yVXlaVGs1TVRSaklpd2lUM0prWlhKU1pXWWlPaUkwTVRBeE1qQTNNVFUwSWl3aVVHVnljMjl1U1dRaU9qRXdMQ0pNYVhabElqcG1ZV3h6WlN3aVJXNTBhWFI1U1dRaU9pSXpNV0V3TmpNeVlpMDROekV6TFRRMk1qQXRPR0ptTWkwd04ySTNaVEpsT1RrZU5HTWlMQ0pCYlc5MWJuUWlPaUkxTUM0d01DSXNJa04xY25KbGJtTjVJam9pUlZWU0luMD0iLAogICAidGhlbWUiOnsKICAgICAgImJhY2tncm91bmRDb2xvciI6IiNGMEYwRjAiLAogICAgICAiZm9ybUJhY2tncm91bmRDb2xvciI6IiMzQzNDM0MiLAogICAgICAicHJpbWFyeUNvbG9yIjoiI0NDQ0NDQyIsCiAgICAgICJ0ZXh0Q29sb3IiOiIjRkZGRkZGIiwKICAgICAgImVmZmVjdHNCYWNrZ3JvdW5kQ29sb3IiOiIjREJEQkRCIgogICB9LAogICAiYXV0b1JlZGlyZWN0Ijp0cnVlLAogICAic2hvd0NhbmNlbEJ1dHRvbiI6ZmFsc2UsCn0=After the payment gateway initializes, your user can go through the whole payment process.
3. Validate the payment
Payment validation works differently depending on whether the payment method is synchronous or asynchronous.
Synchronous payments
For synchronous payments, like credit cards, the entire payment flow completes within the Checkout session. When the user finishes the payment process, the payment gateway redirects them to the URL you defined in the redirectUrl parameter.
Set your redirectUrl to an intermediate page in your application (for example, yourstore.com/payment-verification/{orderId}) where you can query the order status via the Paybyrd API to confirm the payment result:
For example:
curl --request GET '{{paybyrd-gateway}}/api/v2/orders/{ORDERID}
--header 'Accept: application/json'
--header 'Content-Type: application/json'
--header 'X-Api-Key: <your-API-key>'
'
This verification step ensures your application reflects the correct order status, whether the payment succeeded or failed.
Asynchronous payments
For asynchronous payments, like Multibanco, the user completes the payment outside of the Checkout session, for example, at a physical ATM. Since the payment happens independently, redirecting the user back to your application does not provide payment confirmation.
Instead, configure a webhook to receive automatic updates when the order status changes. The Paybyrd API sends POST requests to your webhook URL, notifying you when payments are completed or failed. This enables you to update order statuses in your application reliably, keeping your system synchronized with Paybyrd.
Best practice: Use webhooks for all payment types
Make sure you configure webhooks regardless of payment method type. Webhooks provide a reliable fallback for scenarios where users close their browser before being redirected, or when network issues interrupt the payment flow. When an order status changes, you receive the paymentId and transactionId in the webhook payload, enabling you to verify and update the payment status accordingly.
Read the Webhooks reference to learn more about creating and managing webhooks.
Customizing Paybyrd Checkout
You can customize the color scheme and overall look-and-feel of Checkout. Whether you use an iframe or a direct URL to load the payment gateway, you can use the same parameters to define a visual experience that fits your branding.
Simply add a theme object to configs when you initialize Checkout, with any of these parameters as items:
| Parameter | Description | Accepted values | Required |
|---|---|---|---|
backgroundColor | Defines the background color of the entire page. | Hex color code | No |
formBackgroundColor | Defines the background color of the Checkout form. | Hex color code | No |
primaryColor | Defines the color of accents: borders, input field backgrounds, and button backgrounds. | Hex color code | No |
textColor | Defines the font color. | Hex color code | No |
For example:
{
  ... // other configuration options
   "theme":{
      "backgroundColor":"#000",
      "textColor":"#dccfcf"
   }
}
Read more about each parameter in the Checkout reference.