> ## Documentation Index
> Fetch the complete documentation index at: https://docs.paybyrd.com/llms.txt
> Use this file to discover all available pages before exploring further.
# Start building
> Learn how to access the merchant dashboard and start using the tools Paybyrd provides to build your product.
## Logging in
Your merchant credentials and account details are provided by Paybyrd via email during onboarding. You will need these to access the [merchant dashboard](https://beta.paybyrd.com/).
Sign up first if you do not have an account yet.
After logging in, you can [retrieve your API key](https://beta.paybyrd.com/developer-keys), needed to authenticate all API requests.
You can invite team members to your merchant group or store. Visit the [Team Users](https://beta.paybyrd.com/team-users) page in the Dashboard to set each user’s access level and send an email invitation.
From the merchant dashboard, you can:
* Search and view transactions
* Issue refunds
* Manage store settings and team members
* Download settlement reports
* Configure refund passwords and account settings
***
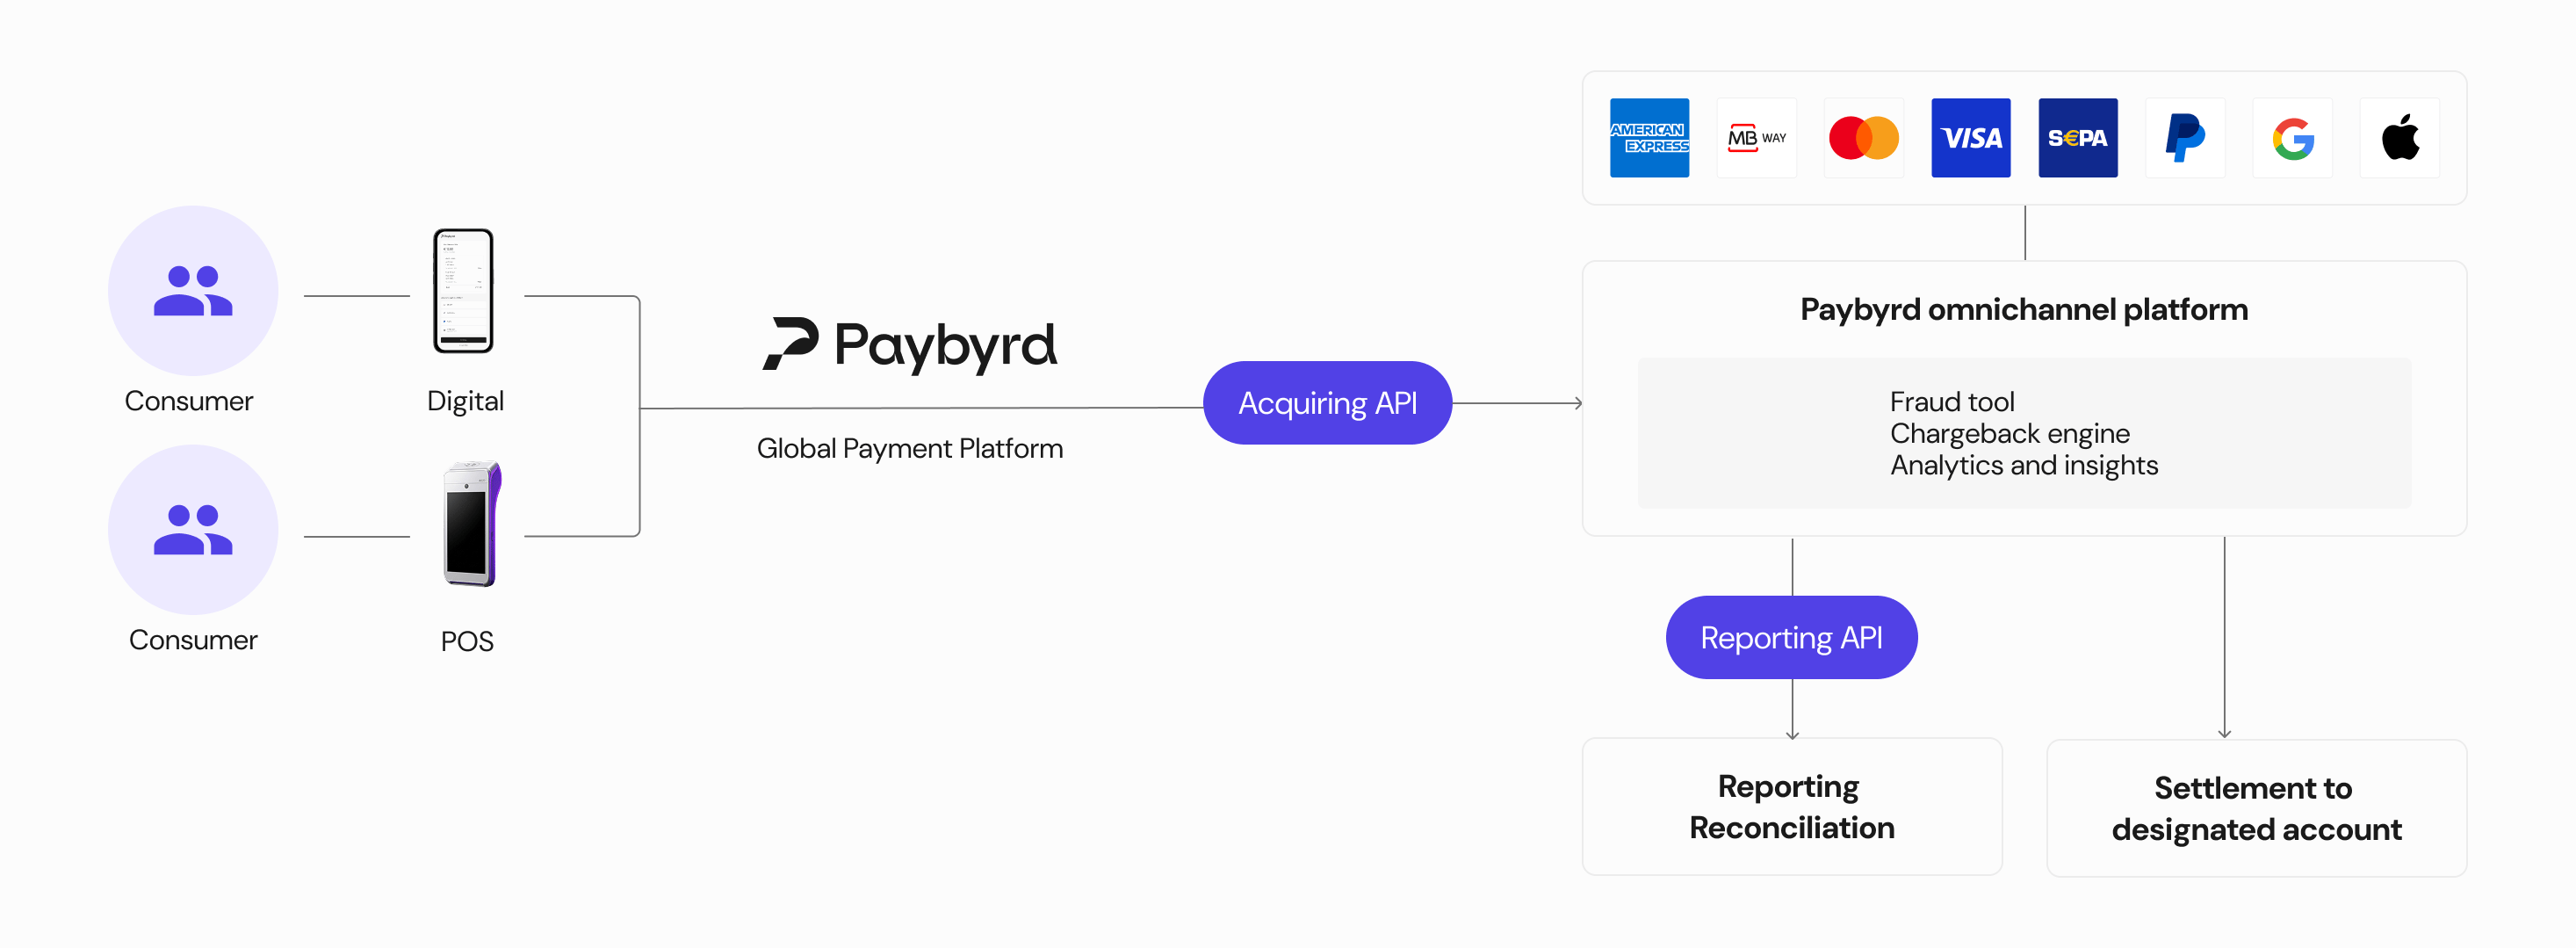
## Start building
You can now start integrating Paybyrd. Your integration path depends on your setup: configure a POS terminal, build a custom online checkout, or install a plugin for your e-commerce platform. This section covers the available options depending on your use case.
 ***
### **POS terminal**
If you have been set up with a Paybyrd POS device, it will arrive pre-charged and ready to use. Follow the setup instructions included in the box. Once connected via Wi-Fi or 4G, the terminal is ready to accept payments.
For full usage instructions, see the [POS Terminal Starter Manual](https://www.notion.so/POS-Terminal-Starter-Manual-d4c64742e25e4791a22b53473d0e83f1?pvs=21).
***
### **E-commerce API**
If you are building a custom online checkout, Paybyrd provides REST APIs and front-end components for secure payment collection.
See the [API Reference](/api-reference/payments/create-payment) and the [Paybyrd Checkout](/embed/checkout) documentation to get started.
***
### **No-code plugins**
If you are using Adobe Commerce (Magento), WooCommerce, or nopCommerce, Paybyrd offers ready-made plugins that add payment support without custom integration.
See the available plugin documentation:
* [WooCommerce](/integrations/ecommerce-plugins/woocommerce)
* [nopCommerce](/integrations/ecommerce-plugins/nopcommerce)
* [Adobe Commerce (Magento)](/integrations/ecommerce-plugins/adobe-commerce-magento)
***
## **Need help?**
* **Chat:** Available from the merchant dashboard (bottom right). On the POS terminal, tap the chat icon in the bottom-left corner.
* **Email:** [help@paybyrd.com](mailto:help@paybyrd.com)
* **Phone:** +351 910 042 417
* **Help Center:** [help.paybyrd.com](http://help.paybyrd.com)
***
### **POS terminal**
If you have been set up with a Paybyrd POS device, it will arrive pre-charged and ready to use. Follow the setup instructions included in the box. Once connected via Wi-Fi or 4G, the terminal is ready to accept payments.
For full usage instructions, see the [POS Terminal Starter Manual](https://www.notion.so/POS-Terminal-Starter-Manual-d4c64742e25e4791a22b53473d0e83f1?pvs=21).
***
### **E-commerce API**
If you are building a custom online checkout, Paybyrd provides REST APIs and front-end components for secure payment collection.
See the [API Reference](/api-reference/payments/create-payment) and the [Paybyrd Checkout](/embed/checkout) documentation to get started.
***
### **No-code plugins**
If you are using Adobe Commerce (Magento), WooCommerce, or nopCommerce, Paybyrd offers ready-made plugins that add payment support without custom integration.
See the available plugin documentation:
* [WooCommerce](/integrations/ecommerce-plugins/woocommerce)
* [nopCommerce](/integrations/ecommerce-plugins/nopcommerce)
* [Adobe Commerce (Magento)](/integrations/ecommerce-plugins/adobe-commerce-magento)
***
## **Need help?**
* **Chat:** Available from the merchant dashboard (bottom right). On the POS terminal, tap the chat icon in the bottom-left corner.
* **Email:** [help@paybyrd.com](mailto:help@paybyrd.com)
* **Phone:** +351 910 042 417
* **Help Center:** [help.paybyrd.com](http://help.paybyrd.com)